I love propagating plants. Actually that’s something of an understatement – at this time of year it’s more of an obsession. The garden and nursery are heaving with potential cuttings material and the seed harvest is taking off in earnest. I hardly know where to start. So I’ll start at the plant nearest the back door, Clematis wilsonii. It’s easy when you know how. Here’s the quick version if you just want the basics:
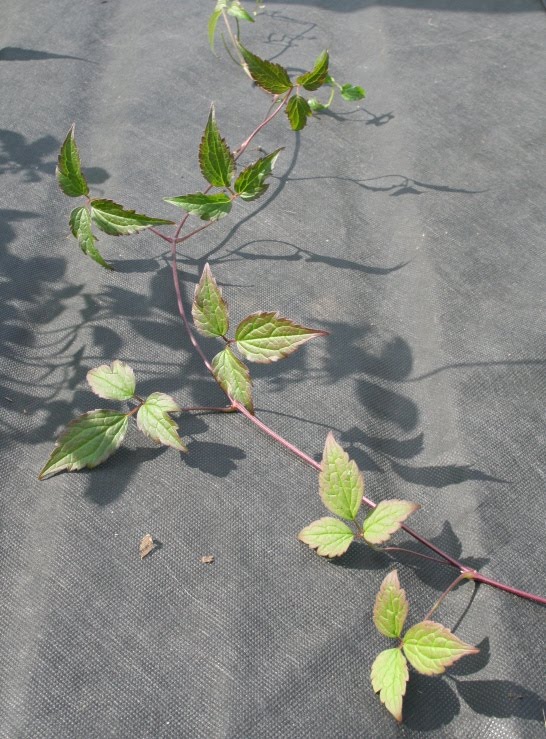

Note which way is up – the two little buds in the leaf joint are always ‘up’. (Click on the picture for a better close up)
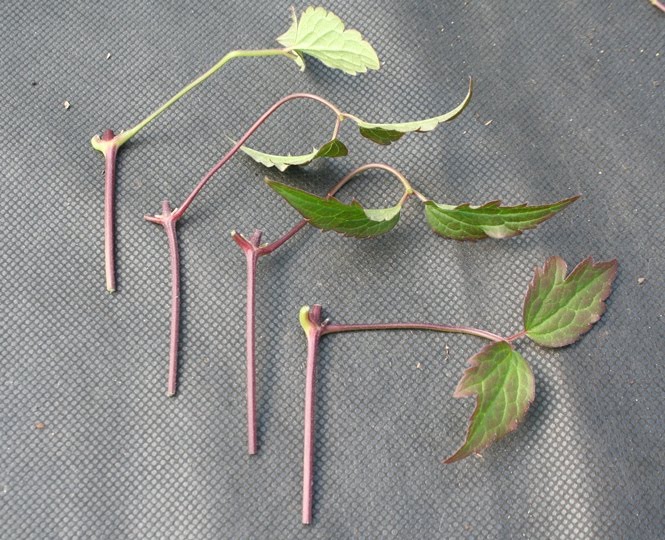
Starting from the bottom of your length of stem, cut as follows for each cutting. I like to use a slim pair of deadheading snips – easier than a knife.
– just above the leaf joint, taking care not to damage the two buds
– snip off one leaf completely
– snip the middle leaflet off the remaining leaf.
and your cuttings should now look like these.
Mix up a very open compost – mine is peat free multipurpose with the bark bits left in, a bit of grit sand for grittiness and a good proportion of vermiculite. I like to set them out across the pot, thus avoiding the tricky problem of leaves hanging too much over the edge of the pot. Push the stems all the way in until the leaf joint is sitting on the compost surface.
Put somewhere warm (bottom heat is good), in the light but out of direct sunlight, keep moist and wait 6-8 weeks.
So that’s a basic ‘how to’. And in case you were wondering…
Is early June the ideal time to take clematis cuttings?
Yes-ish. The plants are putting on good extension growth so there is plenty of material available. But they are quite slow to root and it can be tricky to get newly rooted clematis cuttings through the winter. So about now is the latest I would take them.
Does it matter which plants you take the cuttings from?
Possibly yes. Shoots from young plants seem to root better than the same-looking shoots from old plants. The biological age of the plant can affect rooting ability.
Shouldn’t you make the bottom cut through a node for best rooting?
Yes, in an ideal world because cambial cells are clustered at the nodes. But with clematis and other climbers the cuttings would be unfeasibly long, as you must cut above a node to get growth shoots. There are enough cambial cells in the stem for internodal cuttings to take.
Why do you snip off all of one leaf and part of the other one?
Since I have cut off the cutting’s roots it can’t support much leaf area. I therefore reduce the leaf surface area by 2/3 making as few tiny snips as possible, causing as little damage as possible to the remaining leaves. The reason for leaving any leaf on at all is so that the plant can still photosynthesise.
Why don’t you put the cuttings around the edge of the pot?
There is only any point putting cuttings around the edge of unglazed clay pots as they are air porous. Roots need oxygen to respire and grow. The edge of a plastic pot is not a great place for a root to grow – less oxygen and prone to great heat changes
Do you use rooting hormone powder?
I do when I’ve got it to hand, for clematis. But it’s important not to over-use it as too much can inhibit rooting. Just touch the cut end onto a small amount and flick to remove surplus. On balance, it’s probably best to use it for clematis.
I’ve read that commercial growers root them in pure perlite – why don’t you?
Mainly because I don’t like the stuff – it behaves weirdly, floats and won’t stay still. It also dries out in no time. Probably fine if you have a full time job propagating clems and are onto them all day, but I’m busy. I need a compost that will stay reasonably moist for at least half a day at a time, if not longer.
Where exactly should I put them now?
Ideally, the cuttings should be somewhere warm (20-25C), not subject to a draught or too much temperature fluctuation. The air around them should be consistently humid to reduce stress on the rootless cuttings. It should be light, but shaded from direct sunlight. Warmth from below will speed up rooting. I put mine in a large home built propagator. The floor is a sand bed with a soil heating cable going through it and a sheet of weed control fabric on top.
Any notes on aftercare?
Don’t reach for the watering can if the top of the compost looks a bit dry. Check the pot weight and if it seems heavy, mist the cutting instead. The root area doesn’t want to be soggy and wet.
It is important to keep the humidity high around the leaf area. The cutting cannot pull up moisture to cool itself and keep the leaf turgid. High humidity reduces the stress on the leaf.
Resist the temptation to tip the cuttings out and check for at least six weeks. It will probably be about 8 weeks before they’re ready to pot on. If they aren’t ready by mid-September leave them until March. Really. They are more likely to survive.
28 Responses to “How to… take clematis cuttings.”
I'm going to give this a try. I'm a little worried about the last step – "put somewhere warm – bottom heat is good". Sorry, where exactly?
Hi Liz,
A greenhouse is ideal, on a heated pad, but shaded from direct sunlight. Otherwise close to a window but not in the sun, try putting on some black fabric over a piece of polystyrene to raise the temperature underneath.
thanks for this, – i've managed to get clematis cuttings by accident before, but now I know what I actually need to do
Thanks, Trillium – you have just solved a puzzle for me – I've never known why some of my cuttings do so well and others so badly, but it sounds as though it's to do with where I place them in the pot. They'll all be in the centre from now on!
Can you propagate them be laying a lower vine on the ground and cover with a little soil and a small stone to hold it in place?
You can if you only want one or two extra plants. I've not done it myself. You may need to lightly wound the vine below surface, perhaps by removing a leaf and embedding the bare leaf node. Try it!
chigeritch
Bottom heat, try the top of the frig, works for me.
What an excellent and thorough explanation. As I do not have even one green finger the only plant in my expansive garden that I have managed not to kill is my Clematis at the door. There are a few hardy shrubs that persist despite the efforts of the inclement Irish weather and my murderous hands but I really wanted to see if I could get more from my Clematis. If by any miracle I manage to make your good advice work I shall be delighted beyond words. Thank you!
Placing on Christmas lights seems to work well for bottom heat.
Ok, I live in southern Alberta, Canada. I see lots of mature Clamatis around here, but my question is, how do I winter the plants for extreme cold?
Hi, established Clematis are fully hardy – they shouldn't need winter protection. Check what your neighbours do, if anything. If you mean your newly rooted cuttings, they can take cold as well – but I'd be surprised if they could take outdoor winter exposure – it's much colder above ground than below. They'll be OK down to about -5C as long as they are kept fairly dry. They'll appear to die back and then show new growth in spring.
A bright idea…
Your climate is a challenge! I've had good luck with planting my vine very deeply with lots of peat or compost. In the late fall I layer 2 to 3 inches of compost to insulate the roots and provide a boost of nutrition first thing in the spring. Lois Hole's books are a great reference for gardening in zone 3. If you can get them to last the first 2 years, you've usually got it made. Good luck from a North Dakota gardener
Thank you for your advice on Clematis cuttings.After several attempts without success,I shall follow your method.4.30 PM
Thank you for your advice I will certainly try this method.
thank you for your advice,will try to take cuttings in june
.
great advice, will certainly try to do cuttings
great advice will certainly give it a try
I have just found your site, and wish to ask advice as I took cuttings about a month ago from my sisters young plant.
They are in 9cm pots, and have rooted, and grown to approx. 45cm as a single stem.
Should I leave them to get on with growing, or repot them soon? Are they too young to pinch out? I only have the kitchen window sill or outside, but I do live in the south of England and my garden is sheltered
Hi, as it is still early in the year I would pot them on soon – they've got plenty of time to grow on before the autumn. I would pinch them out too rather than let them get too straggly. Once they are established in their new pots (not too big), then put them outside for the rest of the year.
Is it too late to have a go at these – 2nd week of September? I have a plant that I am really keen to take cuttings from and only have until January/February to do so. I am tempted to give it a bash but wonder if I will be wasting my time?
Im going to try this its Aug 19th and I have neighbors who want slips from my clamatis its a jack manney
Can my plant grow new stems my sheep eat the plant completly last year and left only roots..
Thank you for the advice, I can't wait to try it.
Nope, but if there is a hint of a stem left plant it 4 inches deep and put a compost shape cone over and more stems will grow.
Nope, but if there is a tiny hint of a stem attached , plant it 4'' deep and compost a good cone area above then it will grow more stems.
Hi. I just found this. I live in Florida, USA, and I love the looks of these flowers but: Do they grow in this part of the country. I read all the comments and it looks like they are for the cold places. Maybe I need to contact the sellers. Your information is wonderful and helpful. Thank you.
Can you dig up a clamtis toot and replant